Difference between revisions of "Change the Page Orientation, Margins, or Paper Size"
From IMSMA Wiki
| Line 4: | Line 4: | ||
<ol> | <ol> | ||
<li>From the Data Entry Form Template Designer window, click the Page Setup button. | <li>From the Data Entry Form Template Designer window, click the Page Setup button. | ||
| − | The Page Setup window displays | + | The Page Setup window displays.</li> |
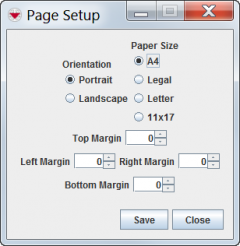
| − | [[File:Page Setup Window.png|240px|'' | + | [[File:Page Setup Window.png|240px|''Page Setup Window'']] |
<li>Change the page setup as needed.</li> | <li>Change the page setup as needed.</li> | ||
| Line 19: | Line 19: | ||
</ol> | </ol> | ||
| + | {{NavBox HowTo Data Entry Forms}} | ||
| − | + | [[Category:ELR]] | |
| − | |||
Revision as of 14:24, 11 December 2013
| |
The Data Entry Form’s page orientation, margins, and paper size should be set up first since elements on the template are not automatically adjusted if you change these attributes later. |
The Data Entry Form Template Designer allows you to change the Data Entry Form’s layout, paper size, and margins. To change the page setup:
- From the Data Entry Form Template Designer window, click the Page Setup button. The Page Setup window displays.
- Change the page setup as needed.
| |
The default settings are A4 paper size, portrait orientation, and 0 cm margins. |
- Do one of the following:
- save the changes to the page setup, click the Save button.
- discard the changes to the page setup, click the Cancel button.
| |||||||||||||||||||||||||
