Difference between revisions of "Enter Geospatial Data in the Data Entry Form"
From IMSMA Wiki
m |
|||
| Line 1: | Line 1: | ||
| − | + | <p>There are several options to enter geospatial data into IMSMA<sup>NG</sup>:<br /> | |
| + | * Manual Data Entry | ||
| + | * Drawing on the Map | ||
| + | * Importing from Excel spreadsheet | ||
| + | * Importing as a shapefile | ||
| + | </p> | ||
| + | |||
| + | To enter the geospatial data into IMSMA<sup>NG</sup>, click on [[File:Pencil.png]]icon on the data entry form. | ||
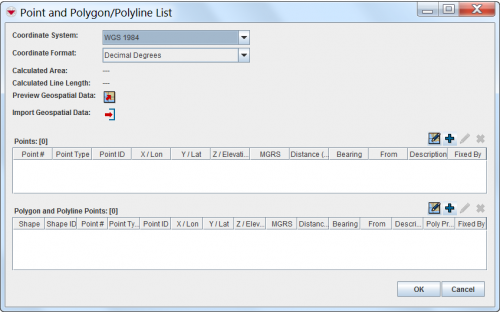
| + | <p>The interface to enter geospatial data consists of two tables: a Points table, and a Polygon and Polyline Points table.</p> | ||
| − | |||
| − | |||
| − | |||
| − | |||
| − | [[Image:PointandPolyListWindow.png| | + | [[Image:PointandPolyListWindow.png||500px|''Point and Polygon/Polyline List Window'']] |
| − | <div align=" | + | <div align="left"> |
''Point and Polygon/Polyline List Window'' | ''Point and Polygon/Polyline List Window'' | ||
</div> | </div> | ||
| − | |||
| − | |||
| − | |||
| − | |||
| − | { | + | {| class="wikitable" width="600" |
| + | |- | ||
| + | | align="center" colspan="2" | '''Buttons for Entering Geospatial Data''' | ||
| + | |- | ||
| + | | width="150pt" | '''Button''' | ||
| + | | width="450pt" | '''Description''' | ||
| + | |- | ||
| + | | align="center" | [[Image:PreviewGeoIcon.png | Preview Geospatial Data]] || Allows you to preview the geospatial data on the map. | ||
| + | |- | ||
| + | | align="center" | [[Image:GeoDataIcon.png | Draw on Map]] || Allows you to record the geospatial data by drawing on the map. | ||
| + | |- | ||
| + | | align="center" | [[Image:FieldTemplateIcon.png | Add]] || Allows you to manually enter geospatial data. | ||
| + | |- | ||
| + | | align="center" | [[Image:FieldViewIcon.png | Modify]] || Allows you to manually change the selected point. | ||
| + | |- | ||
| + | | align="center" | [[Image:EcksButton.png | Delete]] || Allows you to remove the selected point. | ||
| + | |- | ||
| + | | align="center" | [[Image:EditReportIcon.png | Import Points]] || Allows you to import geospatial data from a spreadsheet. | ||
| + | |} | ||
| + | |||
| + | |||
| + | <p>From the Point and Polygon/Polyline List window, you can enter geospatial points in one of several ways: manually, by drawing on the map, or by importing data from a spreadsheet. These options for entering geospatial points are discussed in the following sections. After you have entered the points, IMSMA displays the calculated area size and line length of the geospatial data on each of the summary windows.</p> | ||
{{NavBox HowTo Enter Data}} | {{NavBox HowTo Enter Data}} | ||
Revision as of 15:25, 16 October 2013
There are several options to enter geospatial data into IMSMANG:
- Manual Data Entry
- Drawing on the Map
- Importing from Excel spreadsheet
- Importing as a shapefile
To enter the geospatial data into IMSMANG, click on File:Pencil.pngicon on the data entry form.
The interface to enter geospatial data consists of two tables: a Points table, and a Polygon and Polyline Points table.
Point and Polygon/Polyline List Window
| Buttons for Entering Geospatial Data | |
| Button | Description |
| Preview Geospatial Data | Allows you to preview the geospatial data on the map. |
| |
Allows you to record the geospatial data by drawing on the map. |
| |
Allows you to manually enter geospatial data. |
| |
Allows you to manually change the selected point. |
| |
Allows you to remove the selected point. |
| |
Allows you to import geospatial data from a spreadsheet. |
From the Point and Polygon/Polyline List window, you can enter geospatial points in one of several ways: manually, by drawing on the map, or by importing data from a spreadsheet. These options for entering geospatial points are discussed in the following sections. After you have entered the points, IMSMA displays the calculated area size and line length of the geospatial data on each of the summary windows.
