Sharing an IMSMA Staging Area
It can be useful to share an IMSMA staging area between different actors as a way to share IMSMA data. For example, in a setup where each actor/operator enters its own data into IMSMA (and thus has a subset of the provincial or national data), sharing the global staging area is a way of giving each actor access to the global dataset, without compromising their own IMSMA database.
Contents
Overview
There are several options for sharing the staging area:
- Create a backup, send it to the organisations that should have it, and restore the backup there
- Host the staging area on a server and allow access from the outside
- Host IMSMA on a server and allow remote Staging Area Generators to connect to it
Each option is detailed step-by-step.
Sharing via backup and restore
Backup of the staging area
The first step of option 1 is to create a backup of the staging area database. This is different from taking a backup of IMSMA, because the staging area is not part of the IMSMA application, but a stand-alone PostgreSQL database. A backup can be created using any tool that can connect to the PostgreSQL database (e.g. Navicat). The guide below details the steps using pgAdmin3, a tool that comes for free with every PostgreSQL installation, thus also with an IMSMA installation.
| |
On a computer with IMSMA V6 installed, the executable for starting pgAdmin3 is C:\IMSMAng\pgsql\bin\pgAdmin3.exe. |
In order to create a backup of the staging area database, the following steps are required:
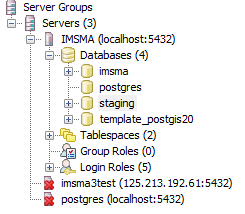
- In pgAdmin3, connect to the PostgreSQL server hosting the staging area -- typically, this server will be localhost, and the port is 5432.
- Open the staging area database by clicking on it
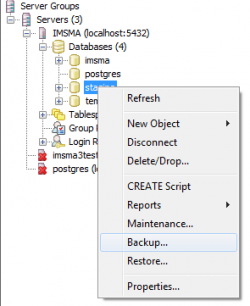
- Right-click on the database (e.g. staging) and choose Backup...
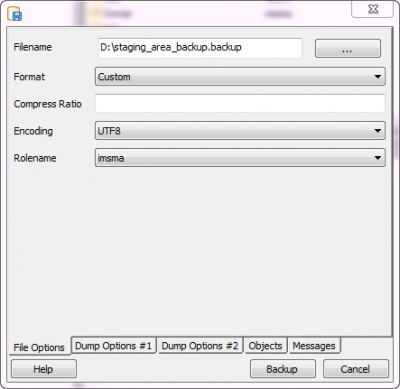
- In the backup window, choose a destination folder and a filename, and the other options as shown in the screenshot below.
- Click on Backup and wait for the backup to finish. Depending on the size of the database, this can take some time. When finished, click Done.
- In the chosen destination folder, there is now a file with the chosen name and the extension .backup (e.g. staging_area_backup.backup).
- This file can now be sent to whoever should receive it.
Restore of the staging area
Those having received the .backup file can then restore it on their PostgreSQL installation. If it is restored on a computer where IMSMA is installed, a PostgreSQL server is available and the staging area can be hosted on the same database server as IMSMA. If IMSMA is not installed, then PostgreSQL first needs to be installed manually. In order to restore a backup of the staging area database, the following steps are required:
- Connect to the PostgreSQL server with a user who has permission to create a new database and restore a database. The imsma user has these permissions. On a computer where IMSMA is not installed, the postgres user could be used, or any custom-created one with enough permissions.
- If no staging area database has been created yet, a new one has to be created. If it already exists, skip this step.
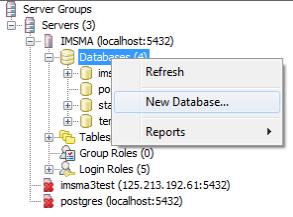
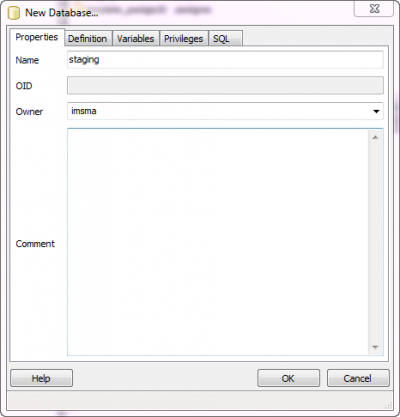
- Create a new database by right-clicking on the root Databases object in the object tree
- Provide a name and an owner for the database. The owner can be chosen from a drop-down list of all database users. If imsma is available, choose it, otherwise choose postgres or any custom-defined user.
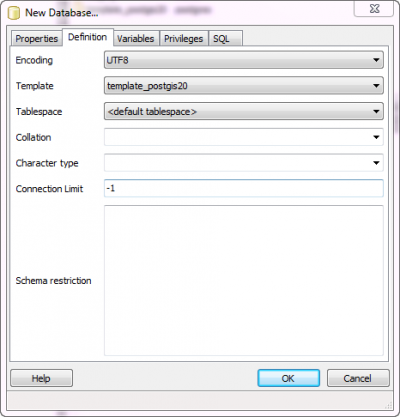
- On the Definition tab, choose UTF8 as the encoding, and template_postgis20 as the template.
- Click OK
- Right-click on newly created (or already available) staging database, and choose Restore...
- In the restore window, choose Custom or Tar as the Format, select the path and filename of the .backup file, and choose imsma (if available) or postgres (or any other custom-defined user) as the Role.
- Click on Restore and wait for the restore process to finish. Depending on the size of the database, this can take some time.
| |
If you have an existing database (e.g. the staging area from last month), it needs to be dropped and recreated, otherwise the restore will only issue errors saying that the tables already exist. As an alternative to manually dropping and recreating a database, scripts can be provided for the restore that allow to specify several options. Please contact your GICHD IM advisor if you wish to implement such scripts. |
Hosting the staging area on a server
The staging area may be hosted on a server allowing clients from within or outside of the network to connect. The following steps are required to achieve this:
- If required, install the Staging Area Generator on the server - this will automatically install PostgreSQL and PostGIS.
- If you have not installed the Staging Area Generator, install PostgreSQL and the PostGIS extension on the server.
- Access the database server with e.g. pgAdmin, Navicat, or any other SQL tool.
- Create a new PostgreSQL database.
- Restore the staging area backup as described above.
- OR, instead of the previous two steps, if the Staging Area Generator is installed and the IMSMA installation is accessible, then the staging area can directly be generated from a remote IMSMA. In this case, in the window in which the parameters for the Staging Area Generator are entered, specific the machine name or IP address on which the source database (IMSMA) is running.
- Ensure that port 5432 (default PostgreSQL port) is open on the server, for the machines having to access it.
- Ensure that PostgreSQL is configured to allow remote connections. This configuration is done via the attribute listen_addresses in the file named postgresql.conf that can be found in the data directory of the PostgreSQL installation (e.g., if IMSMA is installed, then that file can be found in C:\IMSMAng\pgsql\data). If any changes are made to the configuration, the pgSQL service needs to be restarted (Control Panel → Administrative Tools → Services).
The staging area can then be accessed from the specified machines/IP addresses/networks via a JDBC connection.
| ||||||||||||||
