Difference between revisions of "Role Editor Window"
| Line 40: | Line 40: | ||
| Assigns all permissions to the role. | | Assigns all permissions to the role. | ||
|- | |- | ||
| − | | [[Image: | + | | [[Image:RemovesPermission.png]] |
| Removes the selected permission from the role. | | Removes the selected permission from the role. | ||
|- | |- | ||
| − | | [[Image: | + | | [[Image:RemovesPermissions.png]] |
| Removes all permissions from the role. | | Removes all permissions from the role. | ||
|} | |} | ||
Revision as of 18:58, 27 February 2013
| Related Topics |
|---|
| Sample Table |
|
Role List Window |
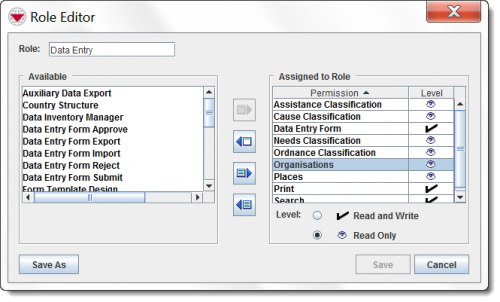
The Role Editor window displays when you click the File:Add.png or File:Pencil.png button on the Role List window. The Role Editor window allows you to assign permissions to or remove permissions from a role.
Role Editor Window
In the upper, left section of the Role Editor window, the name of the role is displayed in the Role field. The permissions that can be assigned to the role are listed in the Available list that is on the left side of the window. The Assigned to Role table on the right side of the Role Editor window lists the permissions assigned to the role and the permission level.
IMSMA includes several predefined roles that have one or more permissions assigned to them. These predefined roles can be used as is, changed as needed, or removed.
