|
|
| (22 intermediate revisions by 4 users not shown) |
| Line 1: |
Line 1: |
| − | <table cellspacing="5" cellpadding="0" style="float: right; clear: right; color: black; background: #f9f9f9; border: 1px solid #aaa; width: 22em; margin: 0 0 1.0em 1.0em; padding: 0.2em; border-spacing: 0.4em 0; text-align: center; line-height: 1.4em; font-size: 88%; background-color: #f5faff; font-size: 90%; width: auto; line-height: 1.6em; width:150px;" class="vertical-navbox nowraplinks">
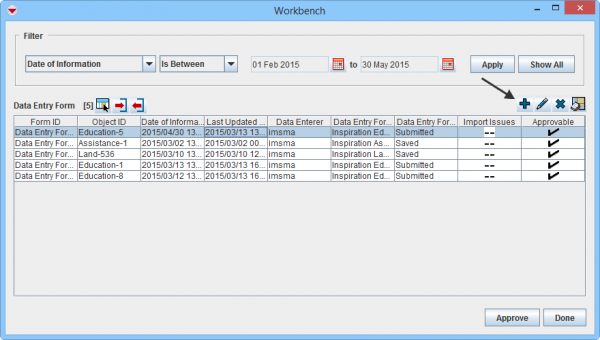
| + | To add a Data Entry Form from the Workbench: |
| − | <th style="padding: 0.2em 0.4em 0.2em; font-size: 145%; line-height: 1.2em; font-weight: bold; background-color: #9aa8b5; font-size: 125%" class="">Related Topics</th>
| |
| − | <tr>
| |
| − | <td style="padding-top: 0.2em; font-weight: bold; background-color: #cee0f2" class="">Using IMSMA</td>
| |
| − | </tr>
| |
| − | <tr>
| |
| − | <td style="padding-bottom: 0.2em; text-align: left">
| |
| − | [[Current View Windows|Current View]]<br />
| |
| − | [[Field Reports]]<br />
| |
| − | [[Geospatial Data]]<br />
| |
| − | [[Search]]<br />
| |
| − | [[Reports]]<br />
| |
| − | </td>
| |
| − | </tr>
| |
| − | <tr>
| |
| − | <td style="padding-top: 0.2em; font-weight: bold; background-color: #cee0f2" class="">Field Reports</td>
| |
| − | </tr>
| |
| − | <tr>
| |
| − | <td style="padding-bottom: 0.2em; text-align: left">
| |
| − | [[Adding and Entering Data|Adding/Entering Data]]<br />
| |
| − | [[Assigning Locations]]<br />
| |
| − | [[Reconciling Items]]<br />
| |
| − | </td>
| |
| − | </tr>
| |
| − | <tr>
| |
| − | <td style="padding-top: 0.2em; font-weight: bold; background-color: #cee0f2" class="">Reconciling Items</td>
| |
| − | </tr>
| |
| − | <tr>
| |
| − | <td style="padding-bottom: 0.2em; text-align: left">
| |
| − | [[HowTo:Export a Field Report to an MDML File|Export Report to MDML File]]<br />
| |
| − | [[HowTo:Export a Field Report to an MaXML File|Export Report to MaXML File]]<br />
| |
| − | [[HowTo:Add a Field Report from the Workbench|Add Report from Workbench]]<br />
| |
| − | [[HowTo:View or Change a Field Report from the Workbench|View/Change Report from Workbench]]<br />
| |
| − | [[HowTo:Remove a Field Report from the Workbench|Remove a Field Report from the Workbench]]<br />
| |
| − | </td>
| |
| − | </tr>
| |
| − | </table>
| |
| − | | |
| − | To add a field report from the Workbench: | |
| | <ol> | | <ol> |
| − | <li>From the '''Data Entry''' menu, select '''Field Reports'''.</li> | + | <li>Select one or more Data Entry Forms and click the [[Image:FieldTemplateIcon.png]] button. |
| − | <li>From the '''Field Reports''' menu, select '''View Workbench'''.</li> | + | [[Image:WB_Add.png|600px|center]] |
| − | :The Workbench window displays.
| + | <div align="center"> '' Workbench window''</div></li> |
| − | <li>Click the [[Image:FieldTemplateIcon.png]] button.</li>
| + | <li>The Data Entry Form Templates window displays.</li> |
| − | :The Field Report Template Selection window displays. For more information, see the ''[[Field Report Templates Window]]''.
| + | <li>Select the appropriate template.</li> |
| − | <li>Click the row in the Field Report Template Selection window associated with the template that you would like to use.</li> | + | <li>Click on the '''OK''' button or double-click on the selected row.</li> |
| − | <li>Click the '''OK''' button.</li> | + | <li>The template opens for Data Entry.</li> |
| − | :The Field Report Editor window displays the selected template.
| |
| − | <li>For information on using the Field Report Editor window, refer to the ''[[Field Report Editor window]]''.</li> | |
| | </ol> | | </ol> |
| | | | |
| − | [[Category:Using IMSMA]]
| + | {{NavBox HowTo Reconcile and Approve}} |
| − | [[Category:Field Reports]]
| + | |
| − | [[Category:Reconciling Items]]
| + | [[Category:NAA]] |
| − | [[Category:How To]] | |
 button.
 Workbench window