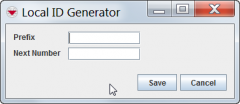
To add a local ID generator:
- Open the Customisation menu, and then select Data Entry Form Customisation > Local ID Generator.
- The Local ID Generator window displays.
- Click the Add button.
- The Local ID Generator window displays.

- Enter the name for the new local ID generator in the Prefix field.
- Local ID generators are typically comprised of the following components:
- [Local ID Name]-[System Name]-[Incremented Number]. For example, CR-HQ-1.
| Local ID Name |
A text string that represents the item category or subcategory. For example, a completion report could be represented by “CR.”
|
| System Name |
A value specified in the Client Configuration Tool of the IMSMANG TrayLauncher where system administrators can set a separate system name for each installation of IMSMANG. For example, the Headquarters installation could have “HQ” as a system name while a regional installation could have “R1.”
|
| Incremented Number |
A value that increases each time a new ID is generated. Information managers can specify the next number to be generated when the local ID generator button is clicked. For example, a new local ID starting with CR-HQ-1 and proceeding to CR-HQ-2 and so on will be generated each time the Completion Report local ID generator is clicked.
|
- In the Next Number field, enter the number you want to assign to the next object of that type that is added to IMSMA.
IMSMA will automatically assign the next sequential number to each subsequent object of the same type that is added to IMSMA. See the following table for an example of how local IDs are assigned.
Table 49.Example Assignment of a Local ID
- Click the Save button.
- If you do not want to save the local ID generator, click the Cancel button.
- Click the Done button to close the Local ID Generator window and return to the IMSMA Navigation window.
